In this guide we will look into what are NVIDIA NIMs and how to run one on your local machine. What you will get:
- NIM with llama3 running on your machine
- Publicly accessible API without configuring your router
What are NVIDIA NIMs?
When I first saw the NIMs announcement I immediately thought of Replicate AI Cogs (https://github.com/replicate/cog) which pretty much are packaged models into a Docker images with web servers on top to expose their APIs. As more and more people are getting into AI, they don’t want to learn Python and they don’t want to directly shell out into llama.cpp, litgpt and other tools to access the models. They want a simple API that they can use to generate text, code, images or audio. NVIDIA NIMs are exactly that - pre-packaged AI models with a server that provides OpenAI API compatibility (when you deploy LLMs).
Types of NIMs:
- The simplest NIMs can be just a LLM server such as https://build.nvidia.com/explore/discover#llama3-8b
- Custom/industry specific NIMs like audio2face https://build.nvidia.com/nvidia/audio2face
- Some upcoming NIMs that will probably have RAG capabilities with a database requirement (quadrant/pgvector/etc) that can generate both embeddings and run the LLM, ref: https://build.nvidia.com/explore/discover/rag.
It could also be quite nice to make a Docker Compose that has those separate NIMs and a reverse proxy in front of them to expose them all under one domain.
How NIMs are built
This is both an easy and hard part. The person who is deploying and using a NIM doesn’t really have to care about it, the only thing that might matter is the CUDA and driver requirements on the host.
The ones I checked have:
- TensorRT-LLM server which provides the API. In their docs it looks like it’s using the huggingface for downloading weights however in NIMs case it’s probably coming from NVIDIA object store.
- Weights are not pre-baked into the Docker image, it will be downloading on the first start hence the familiar
LOCAL_NIM_CACHEenv variable.
Running a NIM
To run a NIM you will need a Docker installed on your machine and a NVIDIA GPU with CUDA support. I have an RTX 4090 so for this I will be running a slightly smaller model - llama3 8b.
Updating CUDA
When I first tried to run the NIM, it immediately failed with the following error:
[TensorRT-LLM] TensorRT-LLM version: 0.10.1.dev2024053000
2024-07-19 22:18:27,542 [INFO] [TRT-LLM] [I] TensorRT-LLM inited.
2024-07-19 22:18:27,542 [INFO] [TRT-LLM] [I] TensorRT-LLM inited.
  File "/usr/local/lib/python3.10/dist-packages/vllm_nvext/hub/hardware_inspect.py", line 85, in _safe_exec
    raise RuntimeError(f"Unexpected error: {status.name}")
RuntimeError: Unexpected error: CUDA_ERROR_COMPAT_NOT_SUPPORTED_ON_DEVICE
Traceback (most recent call last):
  File "/usr/lib/python3.10/runpy.py", line 196, in _run_module_as_main
    return _run_code(code, main_globals, None,
  File "/usr/lib/python3.10/runpy.py", line 86, in _run_code
    exec(code, run_globals)
RuntimeError: Unexpected error: CUDA_ERROR_COMPAT_NOT_SUPPORTED_ON_DEVICE
Looking at the env variables in the NIM Dockerfile I saw these vars:
...
"NVIDIA_REQUIRE_CUDA=cuda>=12.3
...
To fix this I decided to update my machine’s CUDA to 12.5. You can find available downloads here https://developer.nvidia.com/cuda-downloads.
Updating the CUDA and drivers fixed the issue:
root@force1:/# nvidia-smi
Sat Jul 20 17:25:33 2024
+-----------------------------------------------------------------------------------------+
| NVIDIA-SMI 555.42.06              Driver Version: 555.42.06      CUDA Version: 12.5     |
|-----------------------------------------+------------------------+----------------------+
| GPU  Name                 Persistence-M | Bus-Id          Disp.A | Volatile Uncorr. ECC |
| Fan  Temp   Perf          Pwr:Usage/Cap |           Memory-Usage | GPU-Util  Compute M. |
|                                         |                        |               MIG M. |
|=========================================+========================+======================|
|   0  NVIDIA GeForce RTX 4090        On  |   00000000:01:00.0 Off |                  Off |
|  0%   34C    P8              3W /  450W |   20806MiB /  24564MiB |      0%      Default |
|                                         |                        |                  N/A |
+-----------------------------------------+------------------------+----------------------+

+-----------------------------------------------------------------------------------------+
| Processes:                                                                              |
|  GPU   GI   CI        PID   Type   Process name                              GPU Memory |
|        ID   ID                                                               Usage      |
|=========================================================================================|
|    0   N/A  N/A      1775      C   python3                                     20788MiB |
+-----------------------------------------------------------------------------------------+
Getting the NVIDIA registry key
You can try NIMs directly from the NVIDIA’s website, however, I wanted to run it on my local machine. You can find models that have available on-prem installations by looking for “Docker” tab:
First, you will need to register an account and get the API key as NVIDIA’s images aren’t public. Go here https://build.nvidia.com/explore/discover, login with your work email and you will be able to see the Docker tab.
Deploying NIM on-prem
We will use Synpse to deploy the NIM on-prem as it’s the easiest way to deploy and manage containers remotely.
- Register an account at https://cloud.synpse.net
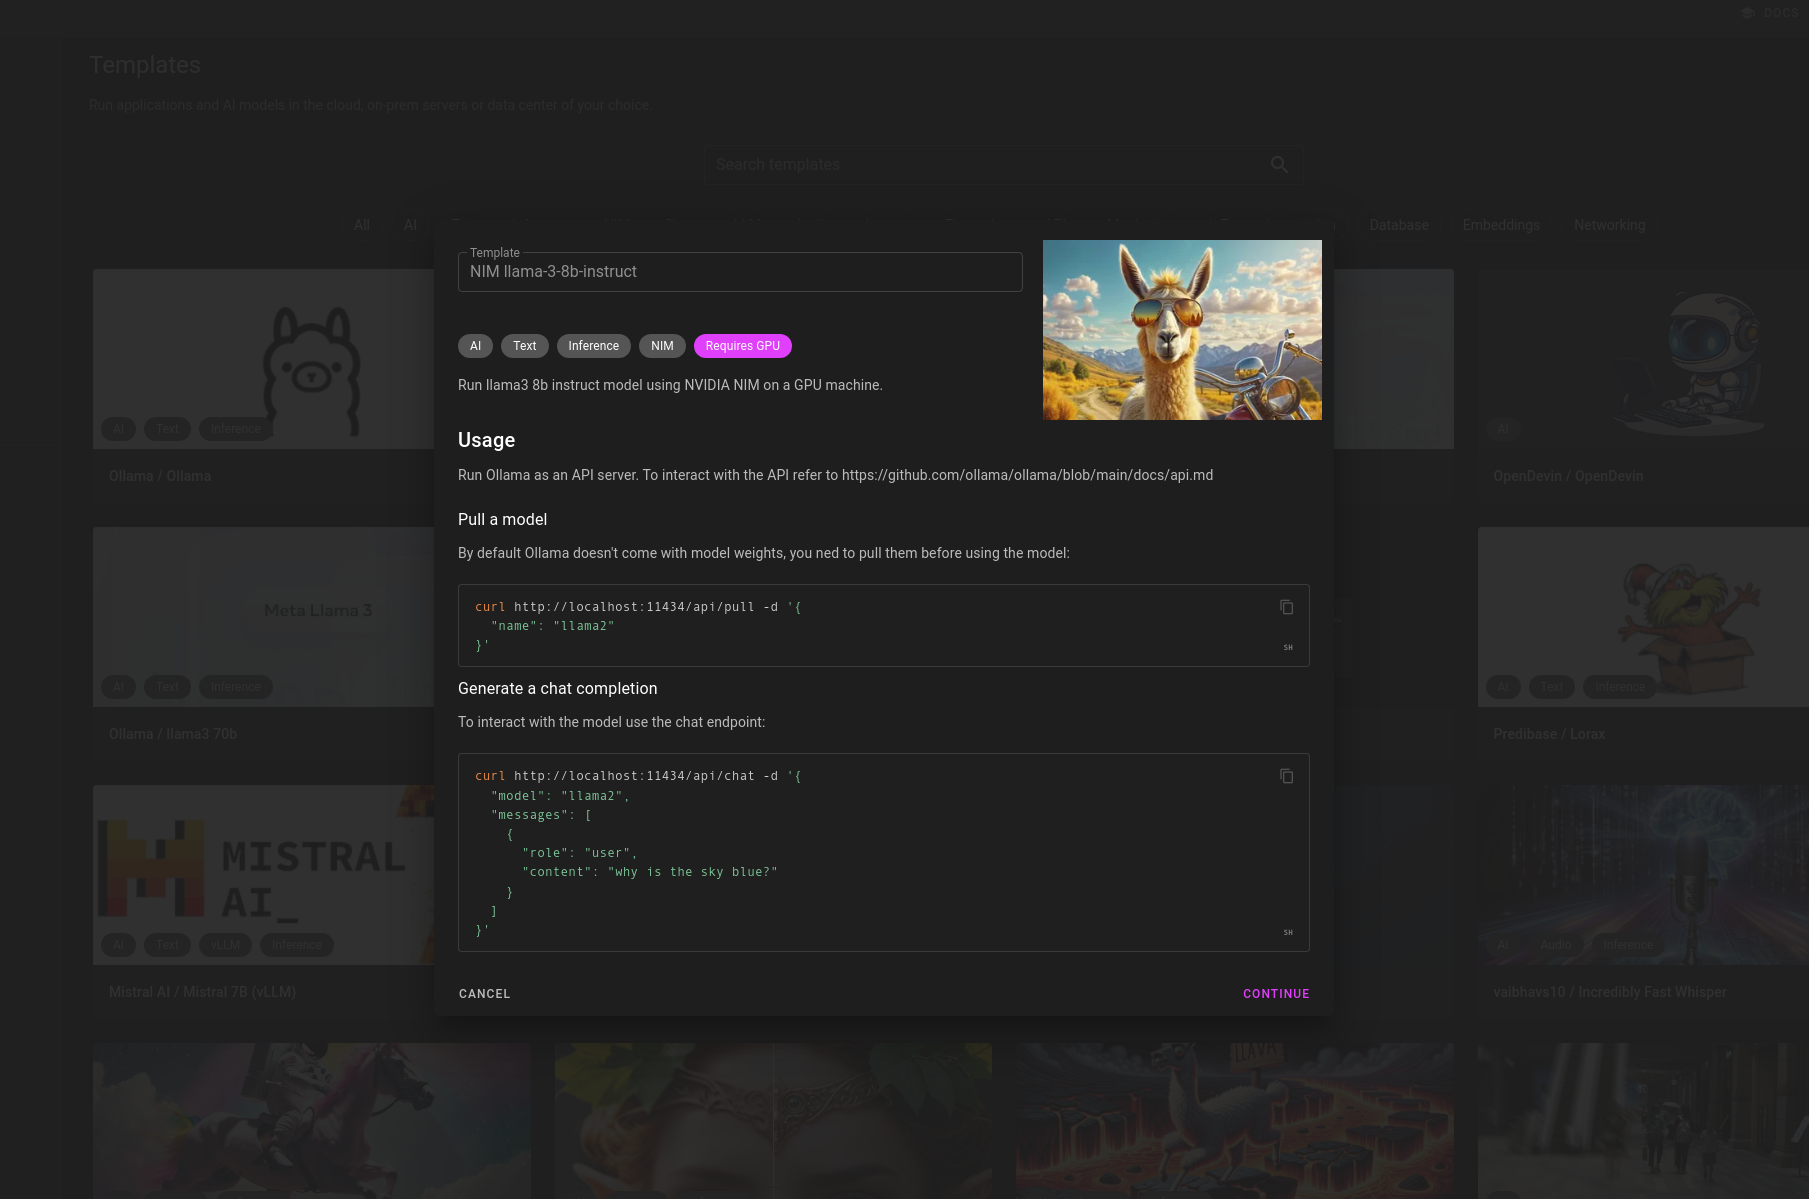
- During on-boarding (https://cloud.synpse.net/onboarding), add your device and at the last step select the bottom option of using the template gallery.
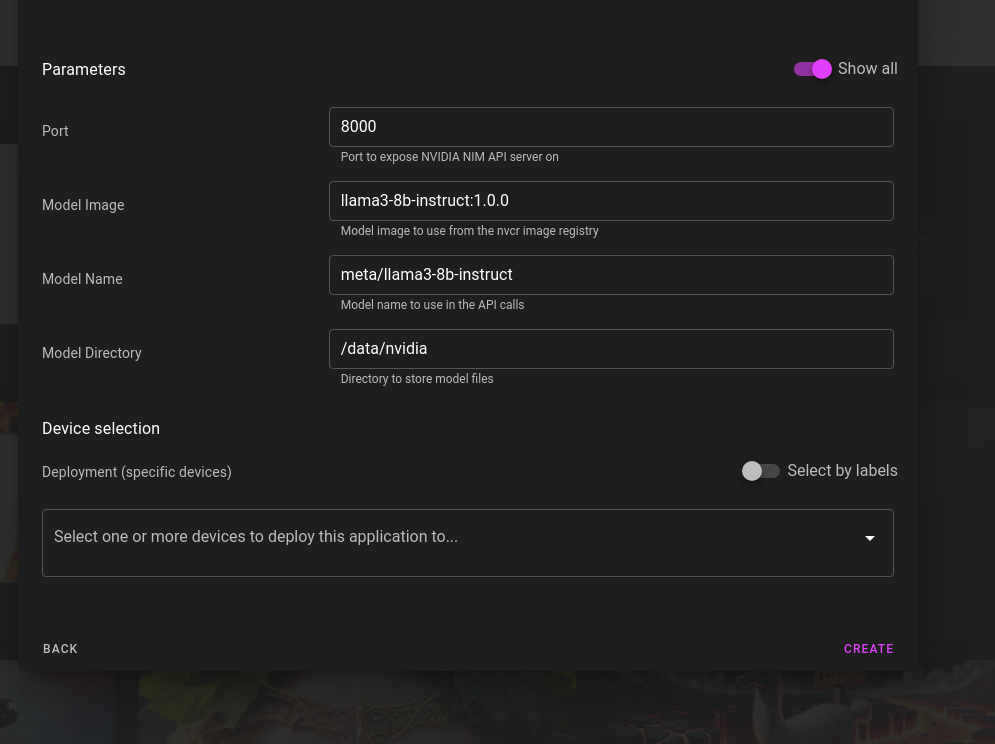
- Select the NIM llama-3-8b-instruct template:
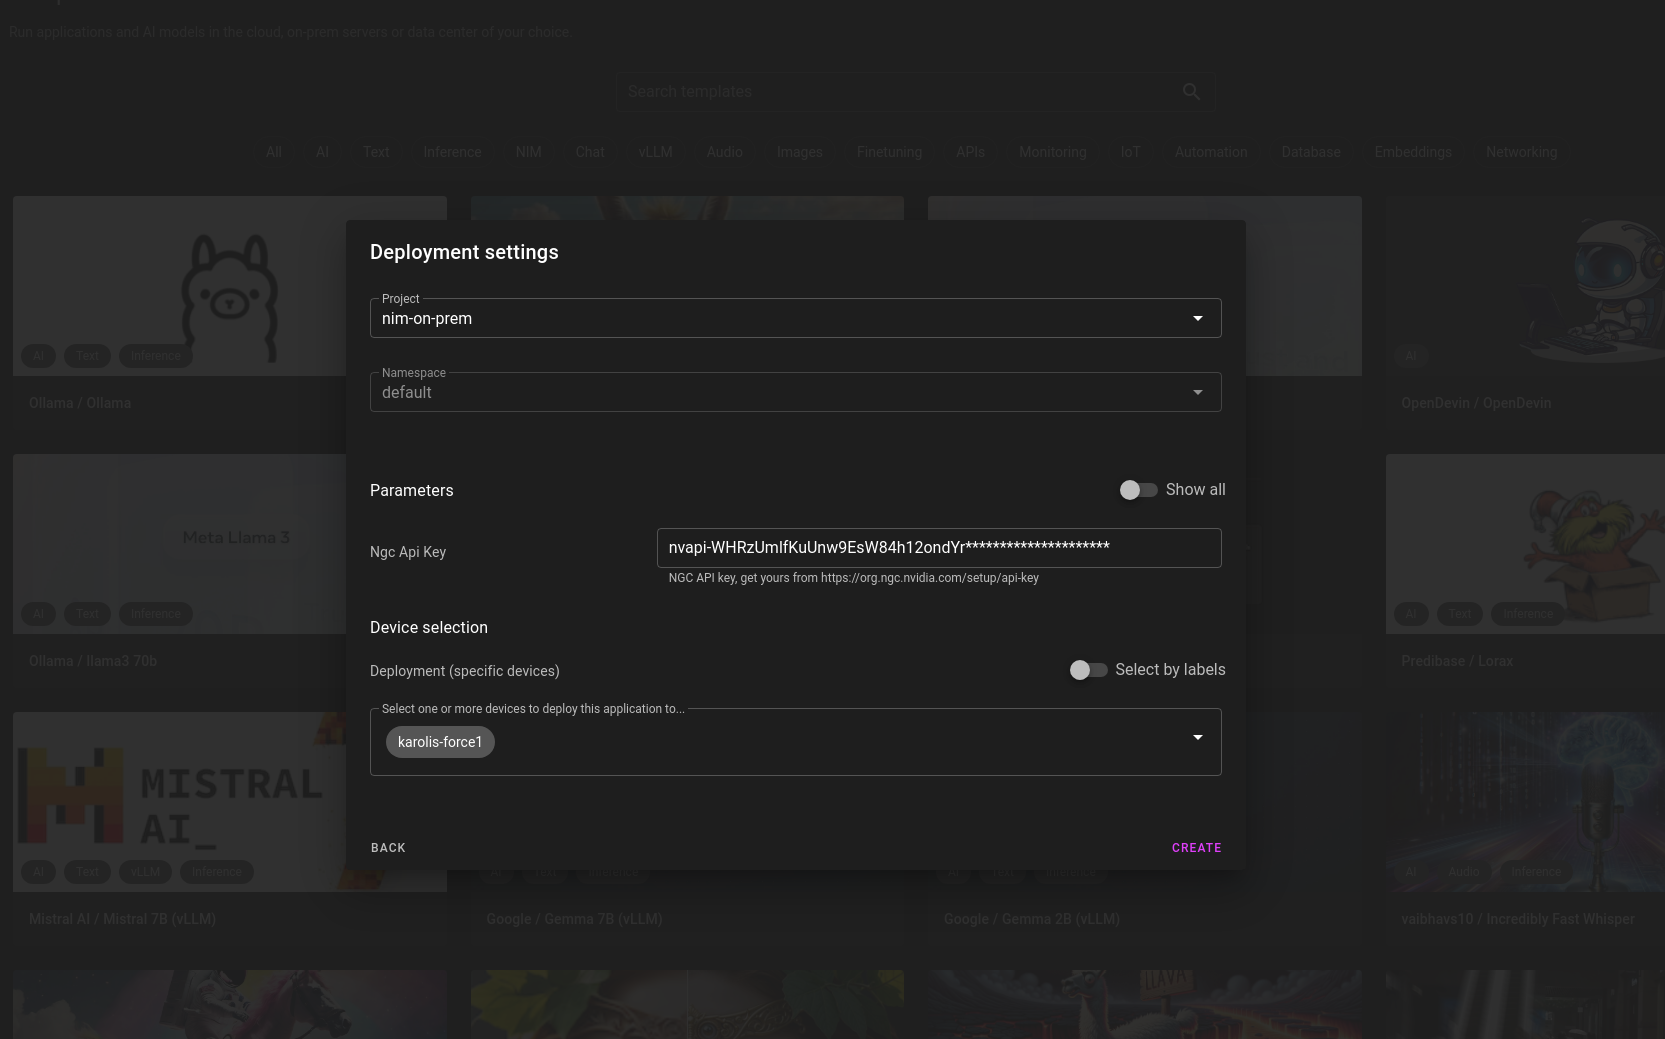
- Click next, enter your NGC API key from the previous section and click create:
Using the NIM API
Synpse will download and deploy the NIM on your machine. Once it’s running, a proxy tunnel will be established from your machine and you will be able to access the model from anywhere.
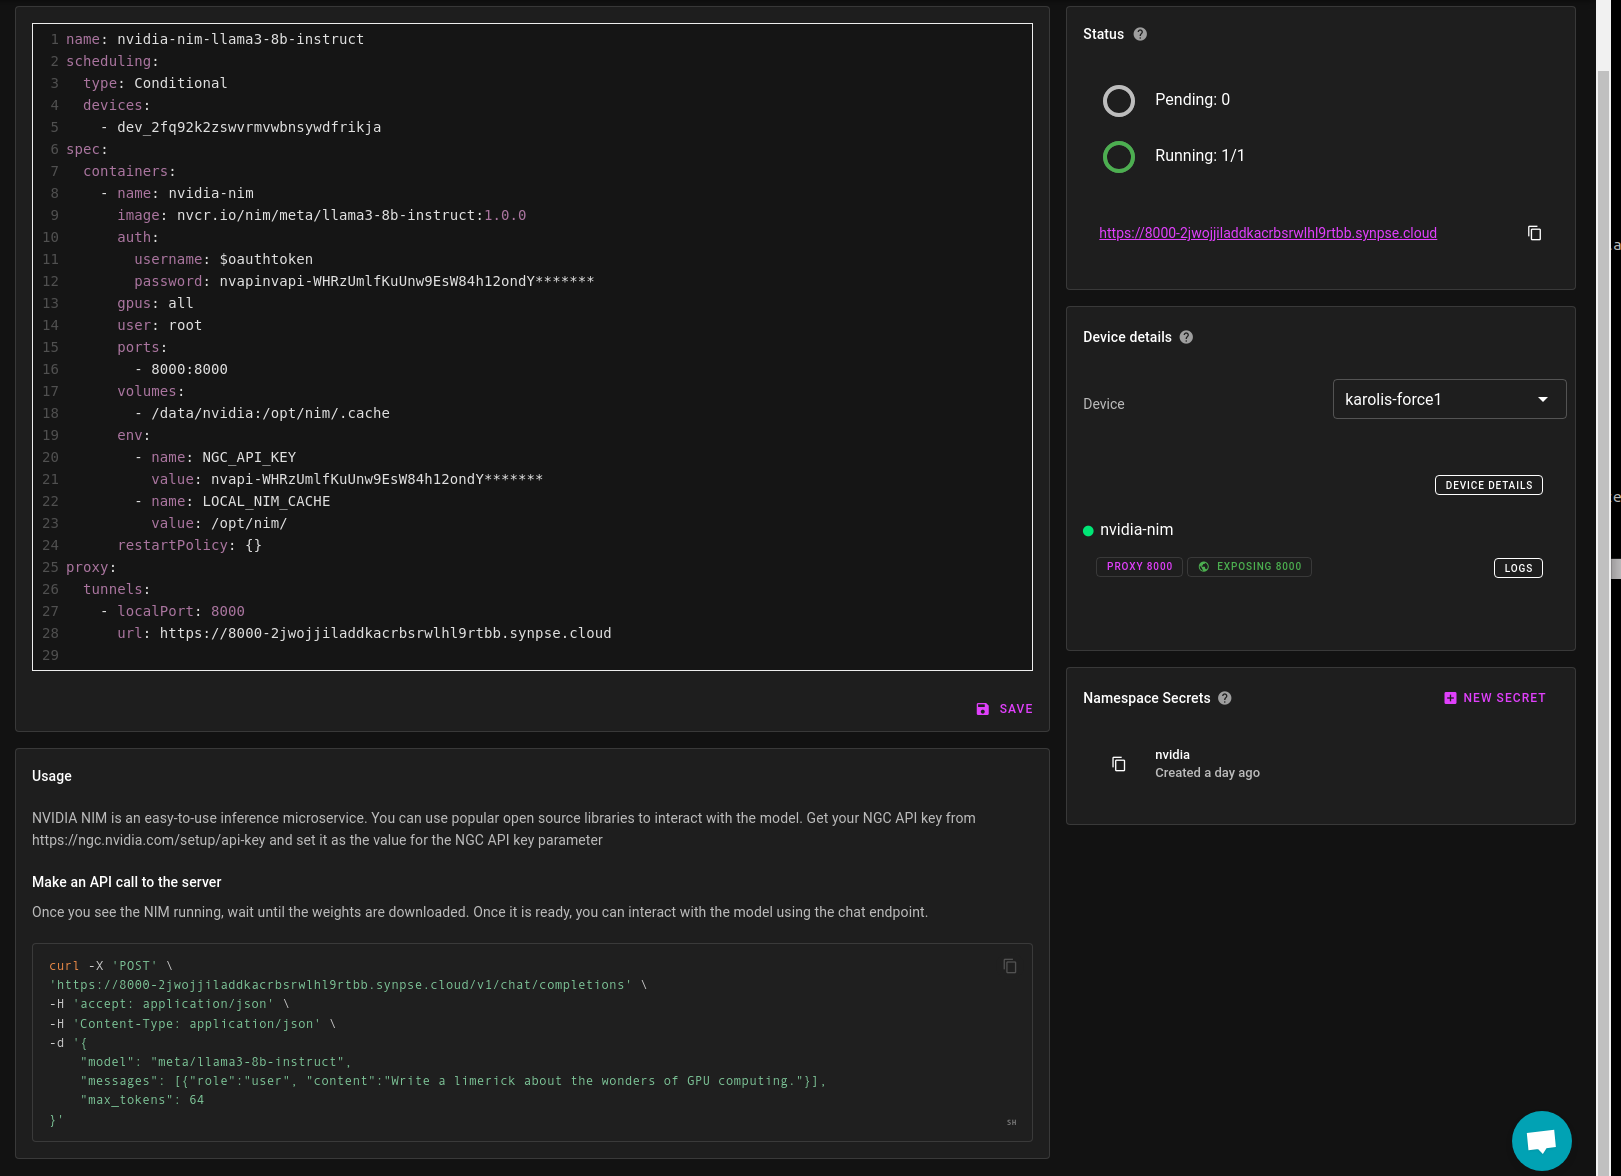
Wait until the model weights are downloaded. This is a tricky part as it’s not saying that it is downloading the weights, for me it was just not responding with anything.
Once it has the model weights, you will be able to curl the model (copy the command from the bottom of the screen in your app details page):
curl -X 'POST' \
'https://8000-your-app-id.synpse.cloud/v1/chat/completions' \
-H 'accept: application/json' \
-H 'Content-Type: application/json' \
-d '{
    "model": "meta/llama3-8b-instruct",
    "messages": [{"role":"user", "content":"Write a limerick about the wonders of GPU computing."}],
    "max_tokens": 64
}'
Choosing a different NIM container
Synpse templates are generic, you can think of them as simplified Kubernetes templates or upgraded Docker Compose. You can easily change the model by either updating an already deployed NIM or by changing the parameters in the template before creating it:
Troubleshooting
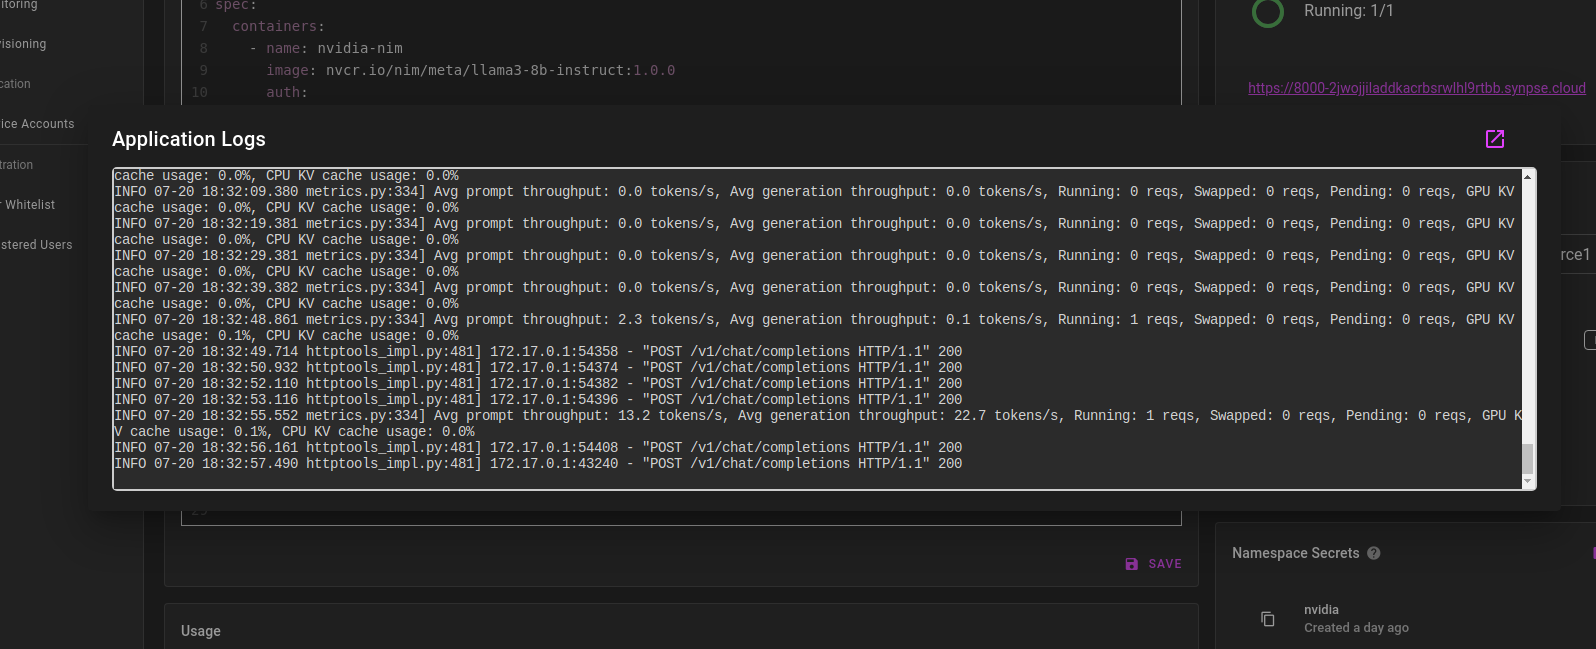
You can view the logs of the NIM container by clicking “logs” button on the right. The container is emitting HTTP request logs and also some useful metrics:
That’s it! You have successfully deployed and used a NIM on your local machine. If you have any questions or suggestions, feel free to reach out.
